Trellising and Pruning
For dragon fruit plants to reach their full potential, they require some sort of support structure. This will allow their branches to hang down, stimulating budding and making the fruit easier to harvest. This page covers the basic requirements for dragon fruit trellises, and the two main types: single pole trellises, and fence trellises, finishing with my favourite design. For other aspects of growing dragon fruit, such as basic care, propagation, and pollination, see the drop-down menu above.

Basic requirements - Strength and durability
When mature, dragon fruit plants can weigh upwards of 200 kilograms, which means trellises must be able to support this sort of weight. Further, dragon fruit plants can live for up to 30 years, and so the materials used must be durable enough to last this time. If you are using exposed metal, make sure it is galvanised or zinc plated, as this will reduce corrosion. If you are using wood, go for rot-resistant options such as hardwood or pressure treated wood, and think about how you could use other materials such as concrete at the base, where there will be excess moisture.
Basic Requirements - Size
While this won’t affect productivity too much, having the right size trellis will make it easier to prune, harvest and pollinate your dragon fruit plants. I would recommend a maximum trellis height of five feet above the ground, as dragon fruit plants can easily grow at least a foot higher than their trellis, making it hard to reach for most people. Further, tall trellises can be more susceptible to wind damage, and can more easily become lopsided due to leverage.
Basic Requirements - Spacing
Similar to size, this is another usability issue. If you have more than one trellis, spacing them too close together will eventually lead to maintenance issues as it will be difficult to move between the trellises when the plants mature. If you are using the single-post method, it is recommended to leave three meters between each post, although this can be reduced if you are planting in rows. Other possibilities include alternating between one high post and one low post, using a fence trellis in between posts, or just having one long fence trellis.
Planting and Maintenance (all trellis types)
After propagating your dragon fruit plants, fill the ground or pot of the trellis with a mix of good quality soil and organic matter, then replant as you would any other plant. Tie the plant to the trellis or an additional stake to support it, making sure it’s not too deep. Feel free to mix varieties so long as they grow with similar vigour, otherwise the more vigorous ones will outcompete the others. Grow one or two shoots from each plant to the top of the trellis, pruning off any additional growths. Once your plant begins to branch out, continue to prune out any shoots in the bottom two-thirds of the trellis, as they will suck energy away from where you will most likely get buds and fruit. When your plant matures, you will also need to start removing some of the shoots from the top, or otherwise they will become overcrowded. A good rule of thumb is to keep every third shoot, with a maximum of three per branch. Keep the ones with the most room to grow, and those that look the healthiest. At the end of the season, I try to make sure the canopy is only one to two layers thick, as branches in the shade of others are less likely to fruit, and a lack of airflow increases the chances of cactus rust. Every five years or so, it is a good idea to do a bit of a heavy pruning of older plants to try and rejuvenate them a bit.

Single Pole Trellises – An overview
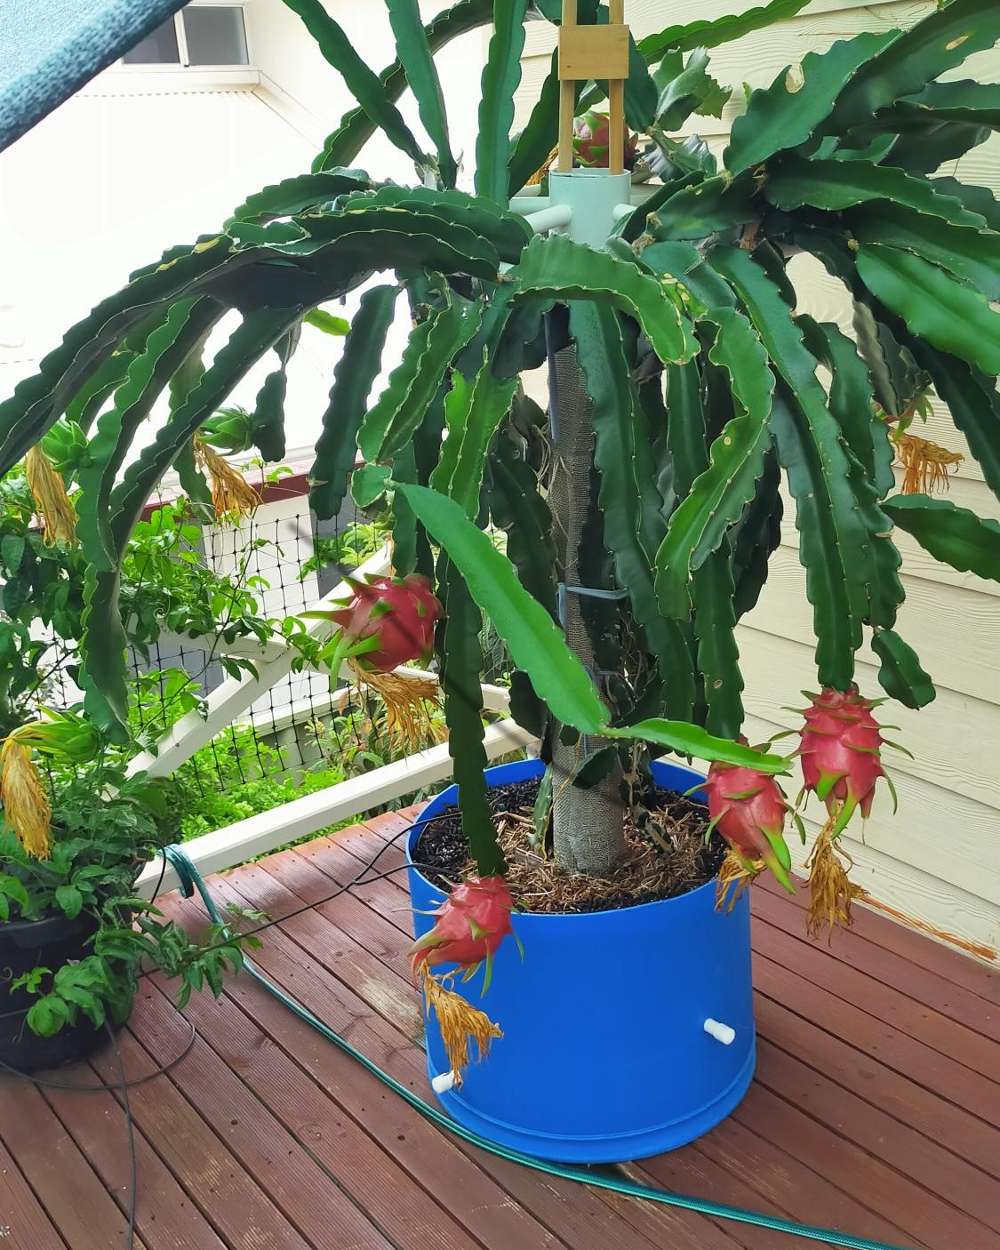
This is the typical style of dragon fruit trellis seen in dragon fruit farms across Asia, allowing the formation of the beautiful “umbrella canopy” reminiscent of weeping mulberry trees. In order for this to happen, a sturdy pole needs to be constructed with some sort of top support. These poles can fit up to four plants (more than four plants will create too much competition for nutrients) around their circumference which branch out in all directions, allowing for good plant density. These branches eventually bend down under their own weight, which creates the canopy. When this happens, tiny cracks start to form in the bending branches, stimulating budding and fruiting. Another advantage of this method is that you can use pots, allowing you to move your plants around as desired.
Single Pole Trellises – How to get the “umbrella canopy”
The most important thing when using this sort of trellis is to train no more than two stems (ideally one) from each plant up the pole, tying it at regular intervals to provide extra support. This often stimulates epiphytic roots which further secure the plant to the pole. If the plant puts out more shoots, remove them right away, as you want all of its energy going into producing a thick, healthy main stem which can support a big canopy and lots of fruit. When these single stems reach about a foot above the top of the trellis, there's a few things you can do. Some growers make a 45-degree (so water runs off) cut in line with the top of the trellis, which induces new shoots near the area of the cut, causing the plant to branch out. Other growers try to bend the branches over, sometimes tying them to the support, until they drape down under their own weight. This is best done at dusk, when the branches have softened from a day in the sun. I personally like to wait and see what the plant does. If it looks like bending over nicely, I sometimes leave it alone entirely, or give it a small amount of help in the direction it is bending (with a bit of force and maybe slowly tying it down, tightening the knot every few days). This induces new shoots along the bend, which is the perfect place for new branches to grow and fill the other side of the trellis. Only if the plant grows straight upwards do I make the 45-degree cut, as I'd rather avoid losing biomass and I find the branching out isn't as effective as the bending method. You do miss out on an early cutting, however, though newer growths aren't the best cutting material. You can always leave it a bit longer if you want a nice cutting.
Single Pole Trellises – Making the pole
The central pole is usually made from concrete, wood, or PVC pipe. Concrete is probably the best option as it is by far the strongest and most durable. However, you will most likely need to make a form (which can be reused), increasing the cost and time to construct. Concrete poles are also very heavy making them harder to handle and less suitable if you want to grow dragon fruit in pots and move them around. If you are using wood, make sure it is resistant to rotting as outlined in "Strength and Durability". I personally don’t like the idea of treated pine when growing food, but I know people who have had success with it. Another option is PVC pipe, which may not be as strong, but it certainly doesn’t break down too quickly. You can pour concrete down its centre for increased strength, and wrap hessian around it for the epiphytic roots.
Single Pole Trellises – Making the top support
There are endless ways to create an effective top support for a single pole trellis, but many designs will use a variant of the following:
1. Motorbike tyre/bike wheel rim fixed to protruding rebar. This can be achieved by
inserting
two
pieces of rebar, or any other bar such as threaded bar which can be bolted, one on top of the other, through the pole of
choice, creating an x-shape that will be very sturdy. Then simply fix the circle of choice to the bar either through holes, bolts, or similar, paving the way for a nice circular canopy when your plants mature. This is the method I use,
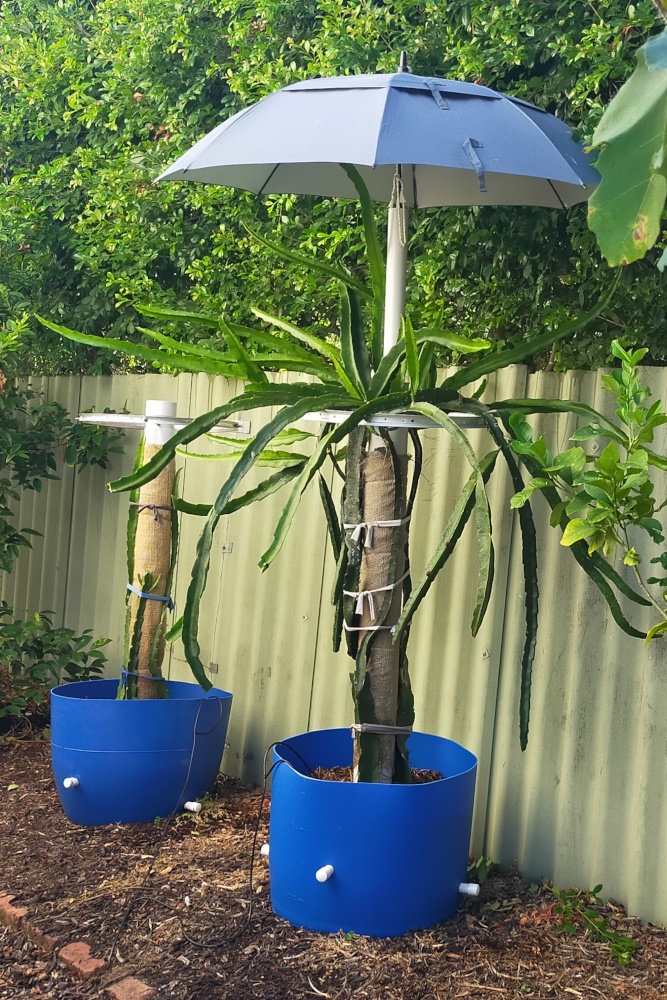
sometimes with an additional extension for an umbrella.
2. Wire mesh fixed to
protruding rebar in a similar manner to above. This is what Spicy Exotics use in combination with a PVC pole. They also attach some flexible tubing in a
circle around the top to prevent the plants from rubbing
against the
metal, as it can be sharp and heats up in the sun.
3. Rebar protruding from the top of the pole. This is commonly used in Thailand where branches are bent over each other,
and little other support is used. The metal is used to guide and tie the dragon fruit branches (see how).
4. Wooden top support. This is only really suitable with a wooden pole and is probably not the best method as over time it will rot. However, it can be a great starting place as it is very easy and quick to construct. Typically
square in shape.
Don't use PVC pipe for the top support because it's not strong enough (I know from experience).
The following are links to some great single pole dragon fruit
trellis designs:
Spicy Exotics' PVC Trellis
Grafting Dragon Fruit's Protected Wooden Trellis
Sackboymahalo's Concrete Tyre Trellis
My Sweet Home Garden's Cinder Block Trellis

Fence Trellises – An overview
Growing dragon fruit over a fence is perhaps the easiest way to get started. Many farms use this method to grow dragon fruit in neat rows, allowing a reasonable density (lower than single pole trellises, however). Once mature, you will have branches sprawling over the fence, and this bending will stimulate budding and fruiting. However, because of the sheer weight of these plants, you may need to bang some star pickets in to prevent the fence from falling over.
Fence Trellises – Training Your Plants
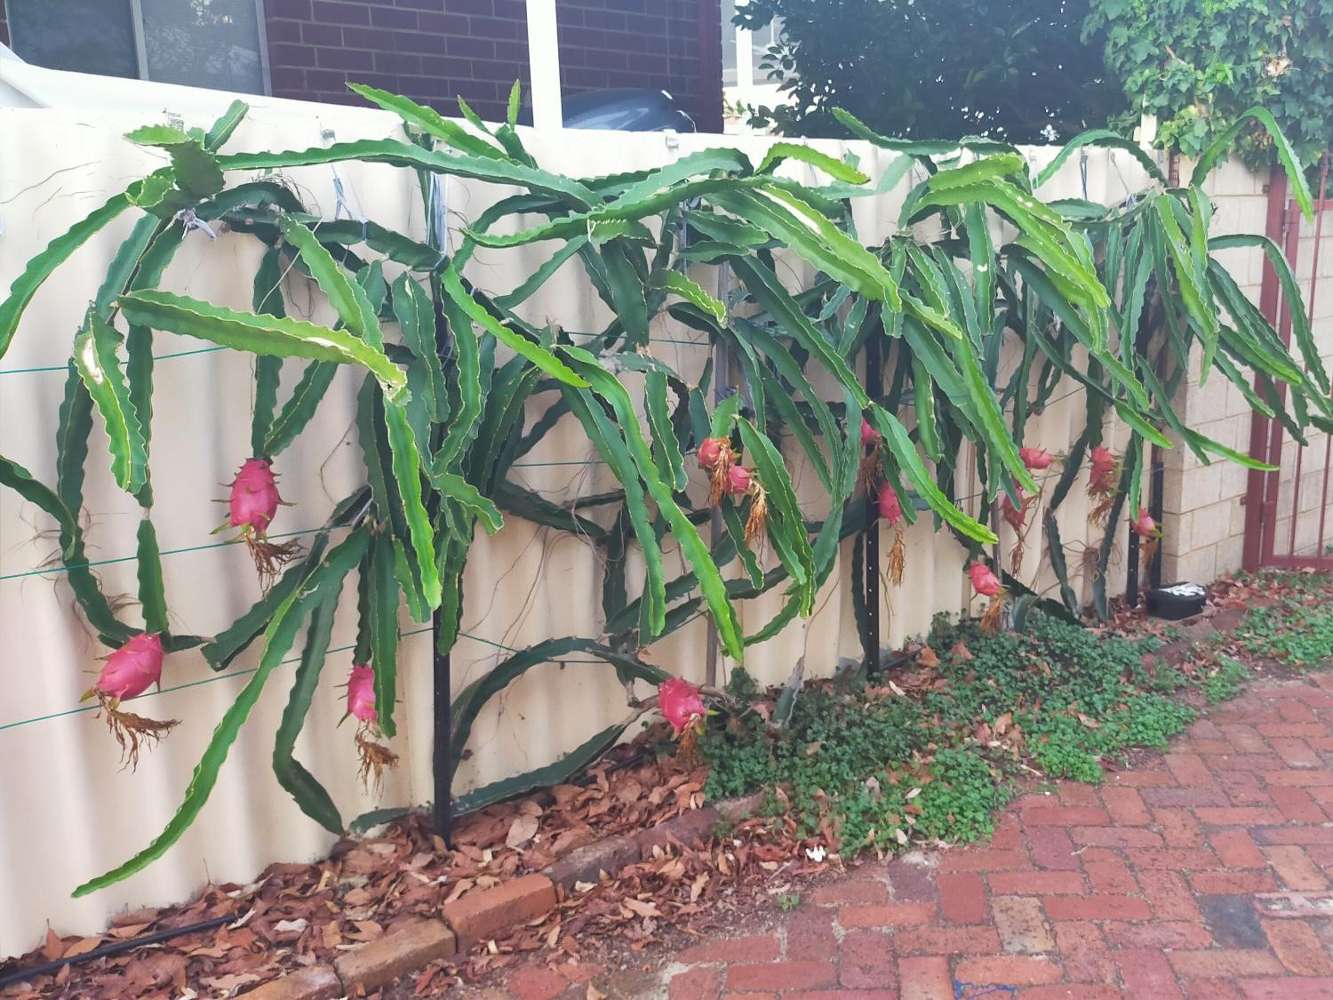
Training your plants on a fence trellis is much the same as with the single post method, however, depending on your fence, it may be more difficult to tie them up. If this is the case, consider banging some stakes in, as dragon fruit plants grow faster when they are supported. This will also limit wind damage, especially in the early days. You can either train them on the same side of the fence as they are growing, as I have done in the picture, or train them over the fence. Both methods will work, but the second is not always possible depending on the nature of the fence (and who owns it).
Fence Trellises - Construction
Of course, if you already have a fence, this will be a much easier task. However, it is important there are no sharp edges where your dragon fruit plants will be growing.
And as I said before, consider adding some extra supports to limit the risk of the fence falling over, as this would be rather damaging to your plants (not to mention the relationship with your neighbours!). But, if you are constructing your
fence trellis from scratch, here are some ideas:
1. Metal posts and wire mesh. This method has proven successful for many growers, such as Self-Sufficient Me. It is commonly used in combination with the
single
pole method, where it can be installed between each
pole. It is a good idea to run some plastic tubing over the top of it for the safety of the plants.
2. Star pickets and wire. While this is not the strongest trellis option, you could always combine it with a pre-existing fence as I have done in the picture. If you want it to stand alone, put some extra supports banged in deep on
either side of
the
trellis to prevent it from
caving in,
and consider fixing a sturdy pole across the top. If you can, get plastic-coated wire (such as washing line), to weave between the holes. This will give you something to tie the stems to as you train them up the trellis, and protect the
plants
from the wire.
3. Wooden rows. This is the method commonly used by farms and is not my favourite because of the risk of rot. However, if you choose the right wood, it will be rather easy to construct and will last a reasonable amount of time.

My Favourite Trellis
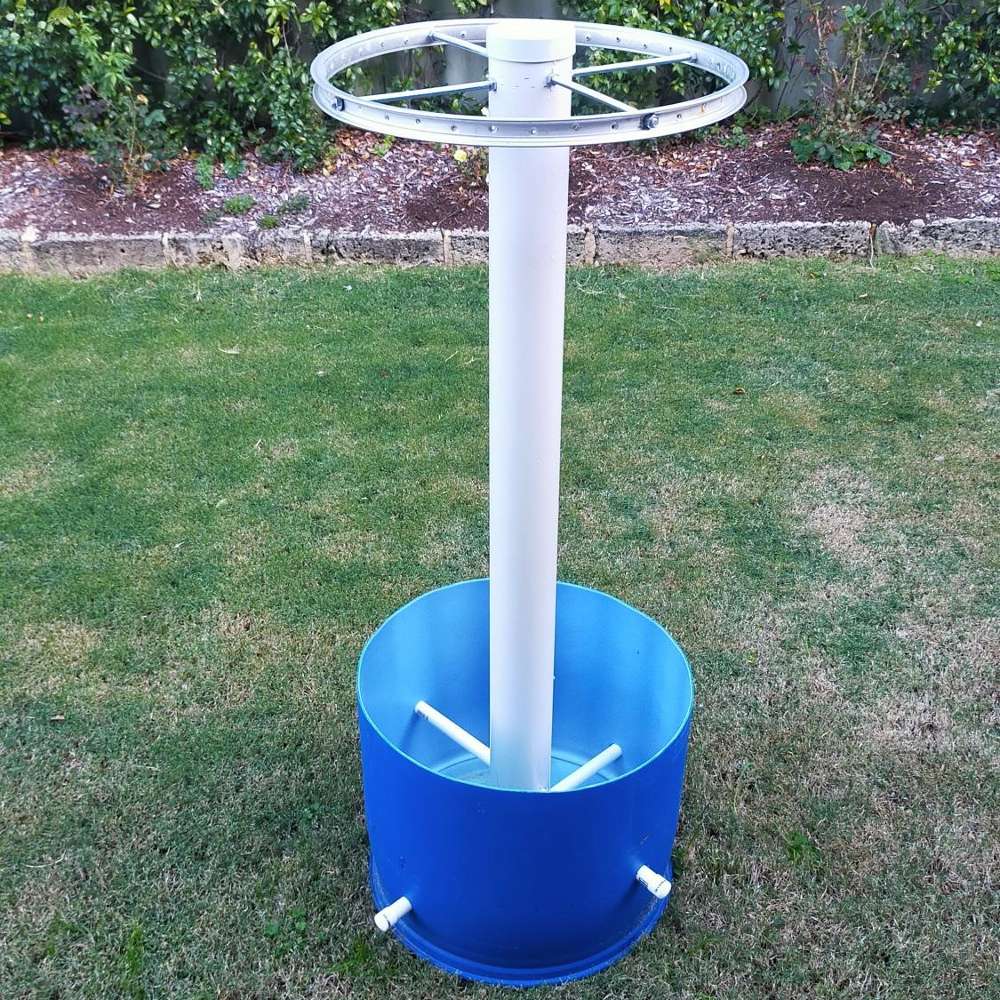
I’ve tried out numerous trellis designs over the years, and by far my favourite is the one to the left (or above, for mobile users). The bottom half is based off the Spicy Exotics trellis design, and the top half is my own creation. It is easiest to make this trellis in pairs. The materials I use are as follows:- Plastic drum, cut in half with a jigsaw. Make sure to drill some drainage holes.
- 3 m x 100 mm PVC pipe, cut in half (four end caps, or two plus "umbrella connections")
- 3 m x 25 mm PVC pipe, cut into four pieces to stabilise the pole (end caps optional)
- Two old bike rims
- 3/8-inch threaded rod, longer than the diameter of the bike rim (four pieces)
- 3/8-inch nuts (16 for each trellis)
- 1 m x 50 mm PVC pipe, cut in half
- Two 100 mm to 50 mm PVC reducers
- Four 25 mm eye screws
- Two lengths of cord/twine (about 1 m)
Assembling the trellis is reasonably straightforward, though it can be difficult to get the pole straight. I like to cut the holes in the drum first, as then I can thread the small pipe through and use it to mark the big pipe. For the threaded rod, one centimetre works well between the upper and lower rod. Refer to the second picture on this page if you are adding the “umbrella connection”. Once you get to the stage in the picture, there's a few things you can do to finish it off. I like to pour concrete down the central pole, filling about a third of the way for increased strength and stability. It's also a good idea to wrap hessian around the central pole so the epiphytic roots have something to grip onto. I've found the best method is to tape one edge of the hessian to the pole, wrap it around a few times, then tie around at different heights with fishing line. After this final step, it's time to get planting!